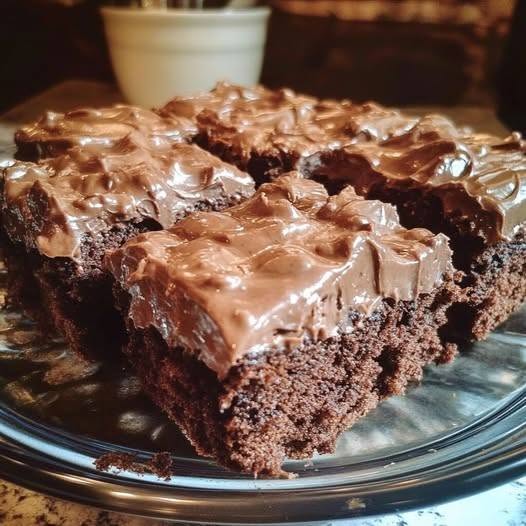
Rich, fudgy chocolate brownies topped with a smooth, glossy chocolate glaze are the ultimate treat for chocolate lovers. These homemade brownies have a soft, moist center, a slightly chewy texture, and an intense chocolate flavor in every bite. The silky chocolate topping adds another layer of indulgence, making them perfect for family desserts, celebrations, or an afternoon chocolate craving.
If you love brownies that are dense, rich, and wonderfully chocolatey, this easy recipe deserves a place in your baking collection.
Why You’ll Love These Chocolate Brownies
- Rich chocolate flavor: Cocoa powder and melted chocolate create a deep, satisfying taste.
- Soft and fudgy texture: The brownies stay moist in the center with a delicate crust.
- Glossy chocolate topping: A smooth glaze makes every square look irresistible.
- Simple ingredients: No special equipment or complicated techniques are required.
- Perfect for sharing: Cut them into small squares for parties, gatherings, or lunchbox treats.
Preparation and Cooking Time
- Prep Time: 20 minutes
- Cook Time: 25–30 minutes
- Cooling Time: 1 hour
- Total Time: Approximately 1 hour 50 minutes
- Servings: 16 brownies
Ingredients
For the Brownies
- ½ cup (115 g) unsalted butter
- 6 oz (170 g) semi-sweet chocolate, chopped
- 1 cup (200 g) granulated sugar
- ¼ cup (50 g) packed light brown sugar
- 2 large eggs, at room temperature
- 1 teaspoon vanilla extract
- ½ cup (65 g) all-purpose flour
- ¼ cup (25 g) unsweetened cocoa powder
- ¼ teaspoon salt
- ½ teaspoon instant coffee powder (optional, for a deeper chocolate flavor)
For the Chocolate Glaze
- 4 oz (115 g) semi-sweet chocolate, finely chopped
- ¼ cup (60 ml) heavy cream
- 1 tablespoon unsalted butter
- 1 tablespoon powdered sugar (optional, for extra sweetness)
Instructions
Step 1: Prepare the Baking Pan
Preheat your oven to 350°F (175°C). Line an 8-inch square baking pan with parchment paper, leaving a little overhang on the sides so you can easily lift the brownies out later.
Lightly grease the parchment paper if needed.
Step 2: Melt the Chocolate and Butter
Place the butter and chopped semi-sweet chocolate in a heatproof bowl. Melt them together in the microwave in 20-second intervals, stirring between each interval, until completely smooth.
You can also melt them in a heatproof bowl over a saucepan of gently simmering water. Set the mixture aside to cool slightly.
Step 3: Mix the Wet Ingredients
In a large mixing bowl, whisk together the granulated sugar, brown sugar, and eggs for about 1–2 minutes until the mixture looks smooth and slightly thickened.
Add the vanilla extract and melted chocolate mixture. Stir until everything is well combined.
Step 4: Add the Dry Ingredients
Sift the flour, cocoa powder, and salt into the chocolate mixture. Add the instant coffee powder if using.
Fold gently with a spatula until just combined. Avoid overmixing, as this can make the brownies more cake-like instead of fudgy.
Step 5: Bake the Brownies
Pour the batter into the prepared pan and spread it evenly.
Bake for 25–30 minutes, or until the edges are set and a toothpick inserted near the center comes out with a few moist crumbs. It should not come out completely clean.
Remove the pan from the oven and allow the brownies to cool completely before adding the glaze.
Step 6: Prepare the Chocolate Glaze
Place the chopped chocolate in a heatproof bowl.
Heat the heavy cream in a small saucepan until steaming but not boiling. Pour it over the chocolate and let it sit for 2 minutes.
Stir slowly until the chocolate melts and the mixture becomes smooth and glossy. Add the butter and stir until fully incorporated.
If you prefer a sweeter glaze, mix in the powdered sugar.
Step 7: Glaze and Chill
Pour the chocolate glaze over the cooled brownies. Use a spatula to spread it evenly across the surface.
Allow the glaze to set at room temperature, or refrigerate the brownies for 20–30 minutes if you want a firmer topping.
Step 8: Slice and Serve
Once the glaze has set, lift the brownies from the pan using the parchment paper.
Cut into 16 squares with a sharp knife. For cleaner slices, warm the knife slightly and wipe it between cuts.
Enjoy your rich, fudgy chocolate brownies!
Tips for the Best Chocolate Brownies
- Use good-quality chocolate: The chocolate is the main flavor, so choose a semi-sweet chocolate you enjoy eating.
- Don’t overbake: Brownies continue to firm up as they cool. Removing them when a few moist crumbs remain helps preserve their fudgy center.
- Measure flour carefully: Too much flour can make brownies dry and cakey. Weighing ingredients gives the most consistent results.
- Let them cool before glazing: Warm brownies can cause the chocolate topping to melt and slide off.
- Use room-temperature eggs: They combine more easily with the melted chocolate mixture.
- For neat slices: Chill the glazed brownies briefly before cutting.
Delicious Variations
Walnut Chocolate Brownies: Fold ½ cup of chopped walnuts or pecans into the batter for a crunchy contrast.
Chocolate Chip Brownies: Add ½ cup of chocolate chips before baking for extra pockets of melted chocolate.
Sea Salt Chocolate Brownies: Sprinkle a little flaky sea salt over the glaze before it sets.
Espresso Brownies: Increase the instant coffee powder to 1 teaspoon to enhance the chocolate flavor.
Double Chocolate Brownies: Use dark chocolate in the batter and milk chocolate for the glaze to create a delicious contrast.
What to Serve with Chocolate Brownies
These brownies taste wonderful on their own, but you can make them even more special by serving them with:
- A scoop of vanilla ice cream.
- Fresh strawberries or raspberries.
- A dollop of homemade whipped cream.
- A drizzle of caramel sauce.
- A cup of coffee, hot chocolate, or cold milk.
For a simple dessert platter, arrange the brownie squares on a glass serving plate and add a few fresh berries around them.
How to Store Chocolate Brownies
At room temperature: Store the brownies in an airtight container for up to 3 days in a cool place.
In the refrigerator: Keep them in an airtight container for up to 5 days. Let them sit at room temperature for a few minutes before serving for a softer texture.
In the freezer: Freeze individual brownie squares in a single layer until firm, then transfer them to a freezer-safe container with parchment paper between layers. Freeze for up to 2 months. Thaw overnight in the refrigerator or at room temperature before serving.
Frequently Asked Questions
How do I know when brownies are done baking?
The edges should look set, while the center should remain slightly soft. Insert a toothpick near the middle; a few moist crumbs are a good sign. Wet batter means they need more time.
Why are my brownies dry instead of fudgy?
The most common reason is overbaking. Too much flour can also make brownies dry. Measure carefully and check them toward the end of the recommended baking time.
Can I make these brownies without the chocolate glaze?
Absolutely! The brownies are delicious on their own. You can also dust them lightly with powdered sugar or serve them with ice cream.
Can I use milk chocolate instead of semi-sweet chocolate?
Yes, but the brownies and glaze will be sweeter and less intense. You may prefer reducing the added sugar slightly if you use milk chocolate.
How do I get a smooth, shiny chocolate glaze?
Use finely chopped chocolate and warm cream. Let the cream sit over the chocolate briefly before stirring gently. Avoid overheating the mixture, which can affect its texture.
Final Thoughts
These fudgy chocolate brownies with smooth chocolate glaze are an easy homemade dessert that delivers rich flavor and an irresistible texture. With a soft, moist center and a glossy chocolate topping, every square is a little chocolate lover’s dream.
Whether you’re baking for a celebration, sharing with friends, or simply treating yourself, this recipe is sure to become a favorite. Make a batch, let the glaze set, and enjoy every delicious bite!