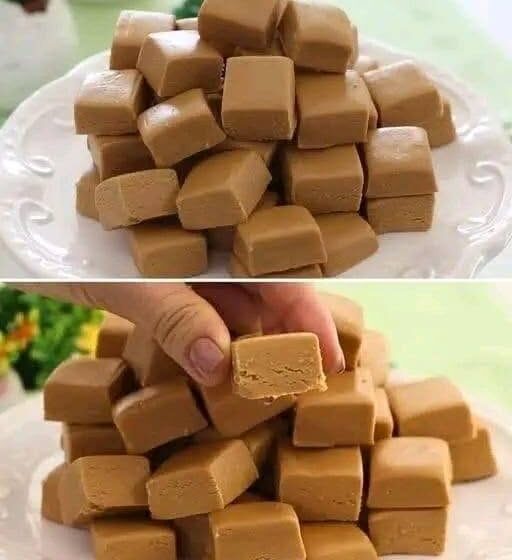
If you love smooth, melt-in-your-mouth desserts, these Creamy Sweet Milk Fudge Squares are a treat worth making. With their rich milky flavor, soft texture, and delicate sweetness, these homemade fudge squares are perfect for holiday dessert trays, afternoon snacks, parties, or a simple sweet treat after dinner.
This easy milk fudge recipe uses a handful of everyday ingredients and requires no complicated baking techniques. The mixture is gently cooked until thick, then chilled until firm enough to cut into neat squares. Whether you’re preparing homemade candy for a celebration or looking for an easy no-bake-style dessert, these creamy fudge squares are sure to become a favorite.
Recipe Details
- Prep time: 10 minutes
- Cook time: 15–20 minutes
- Chilling time: 3–4 hours
- Total time: About 4 hours
- Servings: 24 squares
- Difficulty: Easy
Ingredients
- 2 cups granulated sugar
- 1 can (14 ounces) sweetened condensed milk
- ½ cup unsalted butter
- ½ cup whole milk
- 1 teaspoon vanilla extract
- ¼ teaspoon salt
- 1 cup white chocolate chips, optional, for extra creaminess
Optional toppings:
- 2 tablespoons finely chopped toasted almonds
- 2 tablespoons shredded coconut
- A pinch of flaky sea salt
- ¼ cup mini chocolate chips
Instructions
Step 1: Prepare the Pan
Line an 8 × 8-inch square baking pan with parchment paper, leaving a little overhang on two sides. This makes it easier to lift the fudge out after chilling.
Lightly grease the parchment paper with butter if desired. Set the prepared pan aside while you make the fudge mixture.
Step 2: Combine the Ingredients
In a heavy-bottomed saucepan, combine the granulated sugar, sweetened condensed milk, butter, whole milk, and salt.
Place the saucepan over medium-low heat. Stir continuously with a heat-resistant spatula or wooden spoon until the butter melts and the sugar begins to dissolve.
Scrape the sides and bottom of the pan regularly to prevent the mixture from sticking or scorching. A heavy saucepan helps distribute heat evenly and produces a smoother homemade fudge.
Step 3: Cook Until Thick
Bring the mixture to a gentle simmer, stirring constantly. Continue cooking for approximately 10–15 minutes, adjusting the heat as needed to maintain a steady simmer without vigorous boiling.
The mixture should become thicker and slightly darker in color. For a more reliable result, use a candy thermometer and cook the mixture to approximately 234–238°F (112–114°C), the soft-ball stage. Be careful when handling the hot mixture, as sugar syrup can cause serious burns.
If you prefer a softer, creamier fudge, avoid cooking it for too long. Overcooking can make the finished squares dry or crumbly.
Step 4: Add the Vanilla and White Chocolate
Remove the saucepan from the heat. Stir in the vanilla extract.
If you’re using white chocolate chips, add them now and stir until completely melted and incorporated. The white chocolate adds extra richness and helps create a smooth, creamy texture.
Continue stirring for another minute or two until the mixture looks glossy and evenly combined.
Step 5: Transfer to the Pan
Carefully pour the warm fudge mixture into the prepared baking pan. Spread it evenly into the corners using a spatula.
If desired, sprinkle chopped almonds, shredded coconut, mini chocolate chips, or a little flaky sea salt over the top. Press the toppings gently into the surface so they adhere as the fudge sets.
Step 6: Chill Until Firm
Let the fudge cool at room temperature for about 30–45 minutes. Then transfer the pan to the refrigerator and chill for 3–4 hours, or until the mixture is completely firm.
For the cleanest cuts, allow the fudge to set fully before slicing. Lift it out using the parchment paper and place it on a cutting board.
Step 7: Cut and Serve
Use a sharp knife to cut the fudge into 24 small squares. For neat edges, wipe the knife with a warm, dry cloth between cuts.
Arrange the squares on a serving plate or store them in an airtight container until you’re ready to serve.
Tips for Perfect Creamy Milk Fudge
Use a heavy-bottomed saucepan. Thin pans can create hot spots that burn the sugar and milk. A heavy saucepan helps the ingredients cook more evenly.
Stir continuously. Milk and sugar mixtures can stick to the bottom of the pan, especially as they thicken. Frequent stirring helps prevent scorching.
Measure the temperature carefully. A candy thermometer is helpful because the final texture depends on how far the sugar mixture cooks. Keep the thermometer tip in the mixture without letting it touch the bottom of the pan.
Allow enough chilling time. Cutting the fudge before it is fully set can produce sticky, uneven squares. Refrigerate until firm for the best results.
Cut with a clean knife. A sharp knife creates smooth edges and attractive squares for dessert platters or homemade food gifts.
Easy Variations
- Chocolate milk fudge: Stir in ½ cup milk chocolate chips after removing the pan from the heat.
- Coconut fudge: Add ½ cup shredded coconut to the cooked mixture and sprinkle a little more on top.
- Nutty fudge squares: Fold in ½ cup chopped toasted almonds, walnuts, or pecans.
- Salted milk fudge: Finish with a light sprinkle of flaky sea salt to balance the sweetness.
- Vanilla bean fudge: Replace the vanilla extract with vanilla bean paste for a more pronounced vanilla flavor.
- Caramel-inspired fudge: Add 2 tablespoons of dulce de leche after cooking and swirl gently for a caramel effect.
What to Serve with Sweet Milk Fudge
These creamy fudge squares pair beautifully with freshly brewed coffee, black tea, or a glass of cold milk. For a dessert platter, serve them alongside butter cookies, chocolate truffles, brownies, or fresh strawberries.
They also make lovely homemade gifts. Place the fully chilled squares in small paper candy cups and arrange them in a decorative box. Keep the fudge cool during storage, especially when preparing it ahead for a party or celebration.
Storage Instructions
Refrigerator: Store the fudge in an airtight container in the refrigerator for up to 1 week. Place parchment paper between layers to prevent sticking.
Room temperature: If your kitchen is cool, the fudge may be kept covered for a short serving period. Because this recipe contains milk and butter, refrigeration is the safer choice for longer storage.
Freezer: Freeze the squares in a freezer-safe container, separated by parchment paper, for up to 2 months. Thaw them overnight in the refrigerator before serving.
Avoid leaving the fudge in direct sunlight or in a warm room, as heat can soften the squares and affect their texture.
Frequently Asked Questions
Why didn’t my fudge become firm?
The sugar mixture may not have reached the correct cooking temperature, or the fudge may need more chilling time. If it remains soft after several hours, refrigerate it longer before cutting.
Why is my fudge grainy?
Graininess can develop when sugar crystals form during cooking. Stir consistently, dissolve the sugar thoroughly, and avoid scraping crystallized sugar from the sides of the pan back into the mixture.
Can I make milk fudge without a candy thermometer?
Yes, although a thermometer gives more consistent results. Without one, cook the mixture until noticeably thick and follow the chilling instructions carefully. Keep in mind that the final texture may be less predictable.
Can I make these fudge squares ahead of time?
Absolutely. Prepare them a day or two before serving and store them in an airtight container in the refrigerator. Cut them into squares once fully set.
Can I use evaporated milk instead of sweetened condensed milk?
Not as a direct substitute. Evaporated milk is unsweetened and has a different consistency. Sweetened condensed milk contributes both sugar and concentrated milk solids, so replacing it changes the recipe significantly.
Final Thoughts
Creamy Sweet Milk Fudge Squares are a delicious homemade candy for anyone who enjoys rich, sweet, and smooth desserts. With their simple ingredients, customizable toppings, and make-ahead convenience, they are ideal for holiday celebrations, family gatherings, or an everyday treat.
Follow the cooking temperature carefully, let the fudge chill completely, and cut it into small squares for a beautiful finish. Keep a batch in the refrigerator whenever you want a creamy homemade dessert that’s easy to share.