Soft, Creamy and Sweet No-Bake Treats Coated in White Chocolate and Coconut
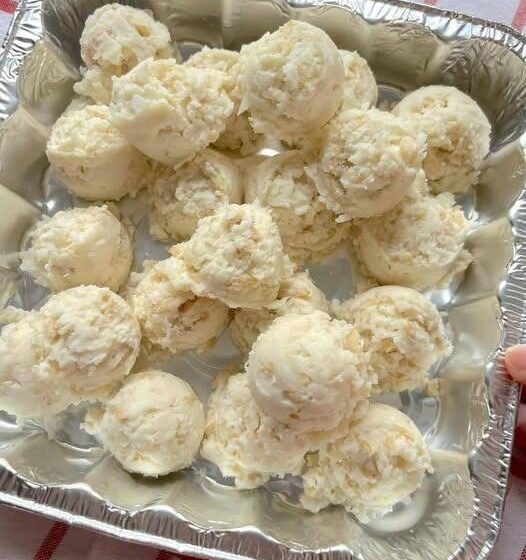
These easy Snowball Cake Pops are a delightful homemade dessert made with soft cake crumbs, creamy frosting, and a delicious white chocolate coating. Rolled into small bite-sized balls and covered with shredded coconut, they look just like little snowballs and make a beautiful addition to any dessert table.
Perfect for birthday parties, Christmas celebrations, baby showers, holiday gatherings, or afternoon treats, these homemade cake pops are as fun to make as they are to eat. Their soft, moist centers contrast beautifully with the delicate white chocolate shell and fluffy coconut coating.
Best of all, this easy snowball cake pop recipe is simple to prepare and doesn’t require complicated baking techniques. You can use homemade vanilla cake or store-bought cake to save time, making this recipe a convenient option whenever you’re craving something sweet.
Why You’ll Love These Snowball Cake Pops
- Easy to make: Simple ingredients and straightforward preparation.
- No special equipment: No cake pop maker or complicated tools required.
- Soft and creamy: A delicious cake and frosting center with a smooth texture.
- Beautiful presentation: The coconut coating gives them a snowy appearance.
- Perfect for parties: Great for birthdays, Christmas, and special occasions.
- Customizable: Easily change the cake flavor, coating, or decorations.
Recipe Information
- Preparation time: 25 minutes
- Cooking time: 25 minutes
- Chilling time: 1 hour
- Total time: Approximately 1 hour 50 minutes
- Servings: 20–24 cake pops
- Course: Dessert, Snack
- Cuisine: American-inspired
Ingredients
For the Vanilla Cake
- 1½ cups (190 g) all-purpose flour
- ¾ cup (150 g) granulated sugar
- ½ cup (115 g) unsalted butter, softened
- 2 large eggs, at room temperature
- ½ cup (120 ml) whole milk
- 1½ teaspoons baking powder
- 1 teaspoon vanilla extract
- ¼ teaspoon salt
Alternatively, use approximately 4 cups (400 g) of crumbled prepared vanilla cake.
For the Cake Pop Filling
- ½ cup (120 g) vanilla buttercream frosting or cream cheese frosting
- ½ teaspoon vanilla extract, optional
For the Snowball Coating
- 12 oz (340 g) white chocolate or white candy melts
- 1 tablespoon coconut oil, if needed
- 1½ cups (120 g) finely shredded sweetened coconut
Optional Decorations
- White sprinkles
- Extra shredded coconut
- Edible pearl decorations
Instructions
Step 1: Prepare the Vanilla Cake
Preheat your oven to 350°F (180°C). Grease an 8-inch round cake pan and line the bottom with parchment paper.
In a medium bowl, whisk together the flour, baking powder, and salt.
In a separate large mixing bowl, beat the softened butter and granulated sugar for approximately 3–4 minutes until light and fluffy.
Add the eggs one at a time, mixing well after each addition. Stir in the vanilla extract.
Gradually add the dry ingredients, alternating with the milk. Mix just until the batter becomes smooth and combined.
Step 2: Bake the Cake
Pour the batter into the prepared cake pan and spread it evenly.
Bake for approximately 22–25 minutes, or until a toothpick inserted into the center comes out clean.
Remove the cake from the oven and allow it to cool completely on a wire rack.
The cake must be completely cool before preparing the cake pop mixture.
Step 3: Crumble the Cake
Transfer the cooled cake to a large mixing bowl.
Using clean hands or a fork, crumble the cake into very fine pieces. Break up any large chunks to create an even, soft texture.
Add the vanilla frosting gradually, starting with approximately ⅓ cup (80 g). Mix until the crumbs hold together when pressed.
Add more frosting a little at a time if necessary. Avoid adding too much, as the mixture should be moist and moldable rather than sticky.
Step 4: Shape the Snowball Cake Pops
Scoop approximately 1 tablespoon of the cake mixture and roll it between your palms to form a smooth ball.
Repeat until all the mixture has been used. You should have approximately 20–24 evenly sized balls.
Arrange them on a baking sheet lined with parchment paper.
Step 5: Chill the Cake Balls
Place the tray in the refrigerator for approximately 45–60 minutes, or until the cake balls become firm.
Chilling is important because it helps the cake pops maintain their round shape when dipped in melted chocolate.
Avoid freezing them for too long, as extremely cold cake balls can cause the chocolate coating to crack.
Step 6: Melt the White Chocolate
Place the white chocolate or candy melts in a microwave-safe bowl.
Heat in 20-second intervals, stirring between each interval until completely melted and smooth.
If the chocolate is too thick for dipping, add a little coconut oil and stir until it reaches a smooth, fluid consistency.
You can also melt the chocolate using a double boiler over gently simmering water.
Step 7: Coat the Cake Balls
Remove the chilled cake balls from the refrigerator.
Using two forks or a dipping tool, carefully dip each cake ball into the melted white chocolate, making sure it is completely covered.
Allow the excess chocolate to drip back into the bowl.
Step 8: Add the Coconut Coating
While the white chocolate is still wet, roll each cake ball gently in the shredded coconut until completely covered.
Place the finished snowball cake pops back onto the parchment-lined tray.
For an extra snowy appearance, sprinkle a little additional coconut over the top.
Step 9: Allow the Coating to Set
Refrigerate the coated cake pops for approximately 15–20 minutes, or until the white chocolate has completely hardened.
Once set, arrange them on a serving platter or place them in small paper candy cups.
Your homemade Snowball Cake Pops are ready to enjoy!
Tips for Perfect Snowball Cake Pops
- Let the cake cool completely: Warm cake can create a sticky mixture that is difficult to shape.
- Add frosting gradually: Too much frosting makes the cake balls soft and difficult to coat.
- Make evenly sized balls: Using a small cookie scoop helps create uniform cake pops.
- Chill before dipping: Firm cake balls are easier to handle and less likely to fall apart.
- Use good-quality white chocolate: This gives the coating a smoother finish and better flavor.
- Keep the coconut finely shredded: Smaller coconut pieces stick more easily and create a beautiful snowy appearance.
- Work in small batches: Keep the remaining cake balls refrigerated while coating a few at a time.
Easy Variations
Chocolate Snowball Cake Pops: Replace the vanilla cake with chocolate cake for a rich chocolate center covered in white chocolate and coconut.
Lemon Snowball Cake Pops: Add 1 teaspoon of finely grated lemon zest to the cake mixture for a refreshing citrus flavor.
Almond Snowball Cake Pops: Add ½ teaspoon of almond extract and use finely chopped toasted almonds in the filling.
Strawberry Snowball Cake Pops: Use strawberry cake and vanilla frosting for a fruity pink center beneath the white coconut coating.
Cream Cheese Snowball Cake Pops: Replace the buttercream frosting with softened cream cheese mixed with a little powdered sugar for a slightly tangy filling. Keep these refrigerated.
Chocolate Coconut Snowballs: Add 2 tablespoons of unsweetened cocoa powder to the cake crumbs for a deeper chocolate flavor.
How to Serve Snowball Cake Pops
These adorable snowball cake pops are perfect for dessert tables, birthday parties, Christmas celebrations, and holiday gatherings.
Arrange them in small paper candy cups or display them on a decorative serving tray. Their white chocolate and coconut coating makes them especially attractive for winter-themed celebrations.
Serve them alongside:
- Hot chocolate or homemade coffee.
- Vanilla ice cream.
- Fresh strawberries and raspberries.
- Chocolate-covered strawberries.
- Christmas cookies and other holiday desserts.
They also make lovely homemade edible gifts when packaged in small decorative boxes.
Storage and Reheating
In the refrigerator: Store the finished cake pops in an airtight container for up to 5 days. Keep them refrigerated, especially if using cream cheese frosting.
At room temperature: Cake pops made with shelf-stable ingredients can be kept in a cool room for a short serving period. For longer storage, refrigeration is recommended.
In the freezer: Place the finished cake pops in a freezer-safe container, separating layers with parchment paper. Freeze for up to 2 months for the best quality.
To thaw: Transfer frozen cake pops to the refrigerator and allow them to thaw overnight. Avoid thawing them at room temperature for extended periods, as condensation may form on the chocolate coating.
Make ahead: Prepare and shape the cake balls a day in advance. Store them covered in the refrigerator, then dip them in white chocolate and coconut before serving.
Frequently Asked Questions
1. Can I make snowball cake pops without baking a cake?
Yes! You can use store-bought vanilla cake or leftover homemade cake. Simply crumble it into fine pieces, mix with frosting, shape into balls, and continue with the coating steps.
2. Why are my cake pops falling apart when dipping?
This usually happens when the cake balls are not chilled enough or the mixture is too dry. Refrigerate them until firm and make sure the cake mixture holds together when pressed.
3. Can I use white chocolate chips instead of candy melts?
Yes. White chocolate chips work well, although they may be thicker when melted. Adding a small amount of coconut oil can help create a smoother coating.
4. What can I use instead of shredded coconut?
You can use finely crushed vanilla wafers, white chocolate shavings, powdered sugar, or white sprinkles for a different snowy finish.
5. Can I make these snowball cake pops ahead of time for a party?
Absolutely! You can prepare them up to two days ahead and store them in an airtight container in the refrigerator. They are an excellent make-ahead dessert for birthdays and holiday celebrations.
Final Thoughts
These Easy Snowball Cake Pops are a delightful homemade treat that combines everything you want in a bite-sized dessert: soft cake, creamy filling, smooth white chocolate, and a delicate coconut coating.
Whether you’re preparing a Christmas dessert table, planning a birthday party, or looking for a fun homemade sweet treat to share with family and friends, these little snowballs are sure to impress. They’re easy to customize, beautiful to serve, and delicious enough to make again and again!